
Blogging is incredibly rewarding. You get to share your passion, connect with like-minded people, and even earn money along the way.
Starting a blog involves choosing a topic, using the right tools, and having a clear plan. While it may seem like a lot, breaking it into steps makes it easier and sets you up for success.
These are the seven exact steps to getting your blog online:
- Pick a niche for your blog.
- Choose a platform for your blog.
- Get hosting and a domain name.
- Build your blog on WordPress.
- Start writing and publishing blog posts.
- Increase your blog traffic.
- Monetize your blog.
Ready to dive into each step? Let’s get started.
1. Pick a niche for your blog
Having a blog niche shapes your content direction, helps you attract the right readers, and keeps you motivated. While there are endless topics you can choose from, here are some tips you can try when picking a niche for your blog:
Identify your passions and areas of expertise
Try listing down 5-10 things you enjoy telling people about. Write them in order from the most to the least exciting for you. Asking yourself these questions can help:
- What am I passionate about?
- What are my past working experiences or projects?
- What am I knowledgeable about?
- What do I enjoy learning?
- Who do I want to help?
- What problems can I solve?
Your blog’s niche can be anything and doesn’t have to be super serious. You could write about your favorite movies, travel mishaps, or quirky snacks. Even the mundane everyday life that you might think is boring will be entertaining for the right audience. If you take a look at our list of 55+ blog examples, you’ll see that many bloggers share about their daily lives.
Something to keep in mind
Google has higher evaluation standards for website topics that fall under the Your Money Your Life (YMYL) category. This includes subjects potentially impacting a person’s happiness, health, finances, or safety. If you plan to produce content in that niche, featuring subject-matter experts’ insights is essential. The time it takes for Google to recognize your blog will also be longer, as you need to work on building a credible reputation on that topic.
Validate your ideas
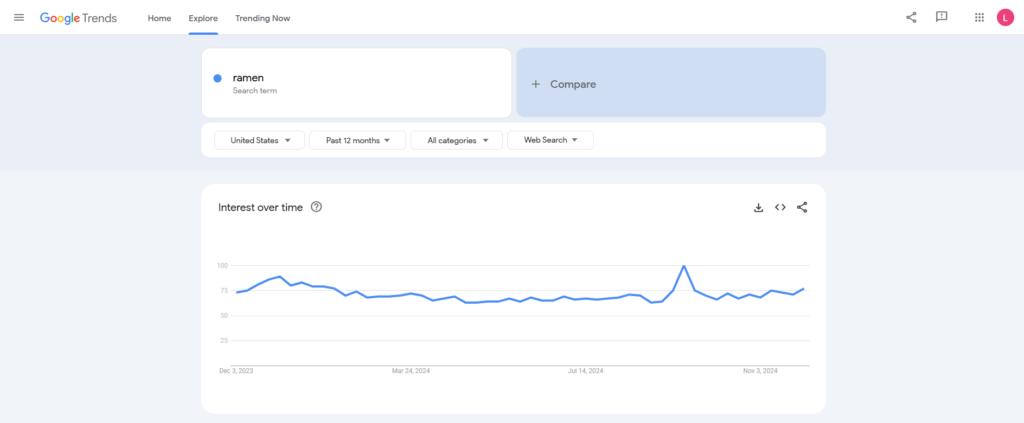
You probably have some blog ideas by now. Great! Let’s use Google Trends to see if there is growing interest in them. Go to the Explore tab and enter your blog niche idea. If you see a stable graph, that means people consistently look up the topic online.
If you have multiple micro-niche ideas, compare their search popularity to see which one is worth exploring more. For example, I’m comparing ramen to mochi. Ramen has a much higher search volume, so it’s likely to have a bigger audience.
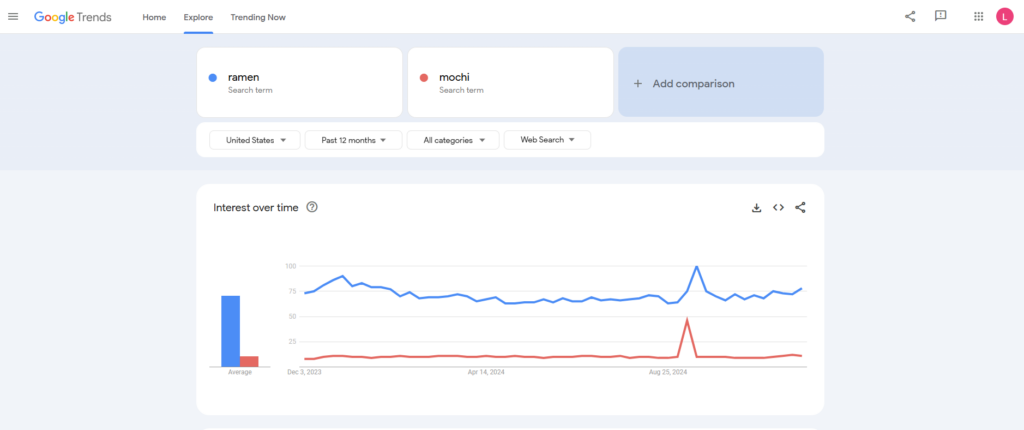
That doesn’t mean you can’t choose a less popular topic. If you’re passionate about a subject and can confirm there’s growing interest, go for it!
Start with a micro niche
There are tons of established bloggers out there. To make your blog stand out, start by writing content on a micro niche. This involves picking a subtopic within a broad niche to narrow down the competition.
For example, if you want to start a food blog, you could focus on a particular cuisine, such as Japanese, Mexican, or Italian.
I’ve been thinking about ramen as it’s raining a lot where I’m from, so let’s take that as an example. With Japanese food as your niche, you can start your blog by diving deep into all things ramen.
Once you establish a loyal readership, you could branch out to other Japanese cuisine staples like sushi, Japanese desserts, or tea culture. This allows your blog to evolve while maintaining its authenticity.
2. Choose a platform for your blog
When choosing a blogging platform, it’s essential to look for one that gives you complete control, allows for easy customization, and can grow with your blog over time. Why? It gives the freedom to adjust your blog as your content, audience, and goals evolve.
I’m sure you’ve heard of free blogging platforms like Blogger, WordPress.com, and Medium. They’re great for starting out and showcasing your writing skills, but these hosted platforms have limited customization and monetization options.
That’s why I much prefer creating a blog on self-hosted WordPress. This content management system (CMS) was introduced in 2003 as a blogging platform, so it has full-featured, built-in blogging tools like advanced post editing and comment management.
Starting a blog on WordPress also gives you these benefits:
- Full ownership and control. You own your blog and content completely, with the freedom to customize every aspect without platform restrictions.
- Extensive themes and plugins. Gain access to a vast collection of themes and plugins to enhance your blog’s design, functionality, SEO, security, and user experience (UX).
- Highly customizable. You can tailor your blog to your exact vision, from themes to plugins to custom code, giving you limitless creative control.
- Freedom to monetize. WordPress makes it easier to monetize your blog in various ways, including ad networks, affiliate marketing, sponsored content, and eCommerce functionality.
- Scalability. WordPress can handle anything from a simple blog to a large, multi-author publication, making it a great choice if you aspire to go big with your blog.
- Vibrant community and support. As the world’s most widely used CMS, WordPress has a large community that is generous with resources, plugins, and troubleshooting advice, making it easy to find support and stay updated on best practices.
For the above reasons, I will use WordPress for this tutorial and encourage you to do the same.
Now that you’ve chosen a platform to host your blog, establish your online identity with a domain name and get a hosting plan to launch your ideas online.
3. Get hosting and a domain name
When creating a self-hosted WordPress blog, you’ll need to choose a web host and purchase a hosting plan so that your blog can go online. Then, buy a domain name from a trusted registrar to make your website easily accessible.
Some web hosting companies, like Hostinger, also act as domain registrars. This way, you can get a web hosting plan and a domain name in one package. You can also claim a free domain name from us by choosing an annual subscription.
Our managed WordPress hosting platform makes starting a blog super easy. With its suite of WordPress-optimized features, setting up your blog and managing back-end tasks is a breeze, leaving you room to focus on writing.
Speaking of the hosting plan, I recommend going with Business, which costs $2.99/month for the 48-month bundle. This way, you can save up to $500 for web hosting and get a bunch of freebies from us, including unlimited SSL certificates and a domain name.
The hosting resources can handle up to 100,000 monthly visitors, and our in-house content delivery network (CDN) service will accelerate your blog’s loading speed.
If you decide blogging isn’t for you, there’s a 30-day money-back guarantee anyway, so there’s no harm in trying.

Web hosting, check. Let’s move on to the domain name.
If you still have no options in mind, try blog name generators to help you brainstorm. The name doesn’t have to be an exact match to your blog name, but making it similar can give your blog a more professional vibe.
Do note that domain names are unique. So, when choosing a domain name, make sure it’s not taken. Use our domain name checker to see if the one you want is still available:
Domain Name Checker
Instantly check domain name availability.
If the domain name you want is unavailable, tweak the name or the extension (the suffix that comes after it). For instance, if the .com version is taken, try going with .net instead.
Less common extensions like .blog, .me, or .online can make your blog address stand out. You can also create a catchy word combination to make a memorable domain name, for example:
- japanesefood.blog
- tasteofjapan.online
- foodiejourney.online
- ramenvibes.me
When ideas pop into your mind, jot them down immediately. They can slip away faster than you realize.
All Comment 1
Login to post a comment
No comments yet
Be the first to drop a comment
Hello there